
This tutorial walks you through Creating a FORMATTED PAGE on our website to help you sell your tickets, and give more info to your customers.
To learn how to create your Tickets (& Event component), go to:
![]()
1. Understanding the Website
First, familiarize with the different sections of the Live Site located at (https://tickets.vacomicon.com).

Section 1 – Top Menu
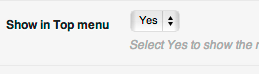
You can decide the items to display here by checking/uncheking the Show in Top Menu option on each Box. These are quick links that help visitors to quickly skim through the sections of the event page.
Section 2 – Event Information
This is where all the information of your event gs, together with the Featured Image and the social buttons.
Section 3. Main
This is the Main section of the event page. You can decide what gs here. The Event Description and Register boxes cannot be moved from the Main section.
You can toggle the position of a box in Main by selecting it in Position .

Section 4. Sidebar
This is the Sidebar section of each event. You can decide what gs here. The Event Description and Register boxes cannot be moved to this section.
You can toggle the position of a box in Sidebar by selecting it in Position as per the above example. Please note that in the mobile version, only the items in the main section will be shown.
2. Title and Description
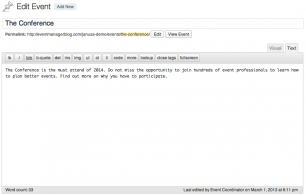
These are the only mandatory fields of the whole page.
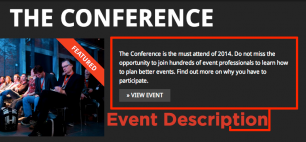
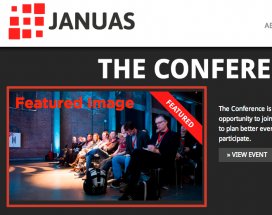
Describe what your event is about. If you decide to make an event Featured (more on this in the next section), the first 55 characters of the description will be displayed in the Home Page as in the image below. Remember not to add any picture here as it may compromise the layout.
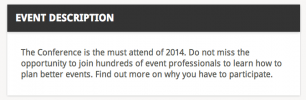
If you don’t feature the event, the description will be shown in a box looking like the one below:
You will be able to decide wether to show the ˜Description’ label on top of the box or the Top Menu from the next section Event Information.
Please note that the Event Description position can’t be moved to the sidebar.
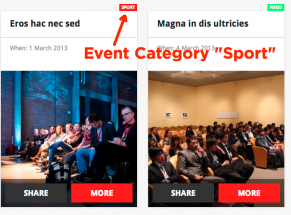
3. Event Categories
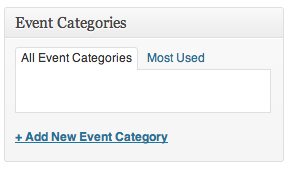
Enter the Name and Slug. Then Save. Once saved open the newly created category to assign a color. This is particularly important as each event has a category label and color in Home Page and Search.
4. Featured Image
This is where you set the MAIN PICTURE that represents your event, and will show up here:
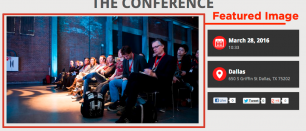
and also here if the event is Featured:
To set a Featured Image look next to the Description box on the right hand side for:
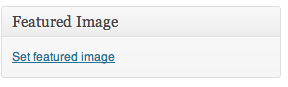
Click on Set Featured Image “ upload an image and save.
5. Controlling your event
This is the control panel of your event. From here you can decide vital information and where the event appears on the site.
Let’s have a look at the panel:
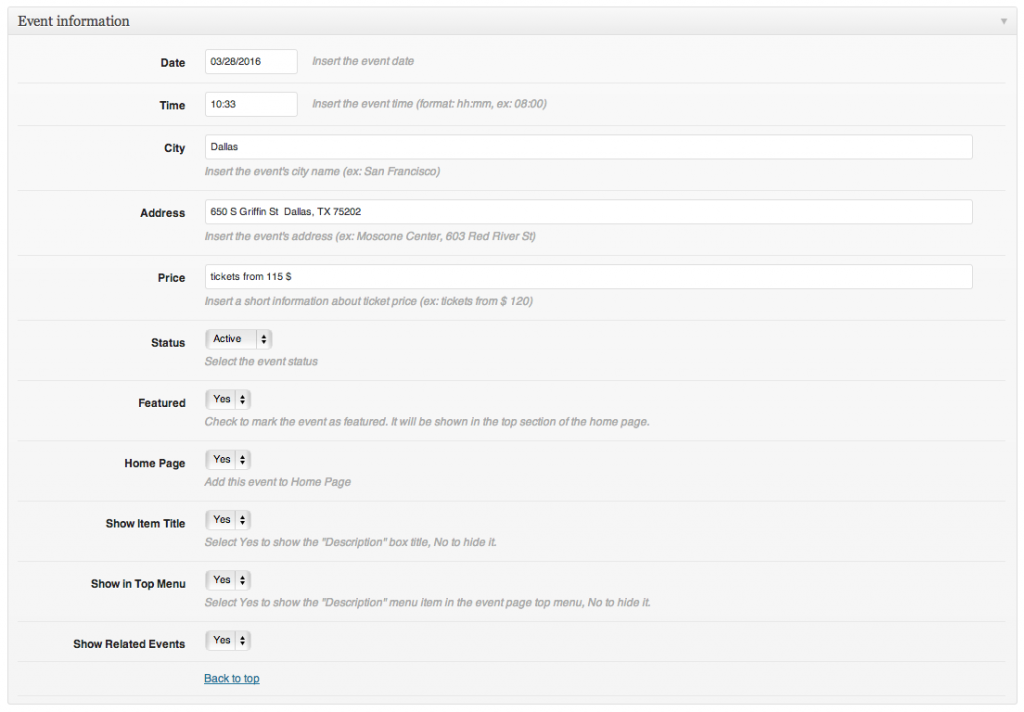
You have the following options:
– Date: the Date of the Event. The date format will be inherited from the Global WordPress Settings (Settings->General)
Please note: The date must be entered in the following format mm/dd/yyyy
– Time: the time of your event “ please enter the time in 24:00hrs ie 5pm is 17:00, 9am is 09:00
– VENUE: the VENUE name of your event
– Address: the Address or Venue information
– Price: a string of text to indicate your event ticket price. Enter your preferred text
– Status: you can decide whether your event is Active (accepting registration), Sold Out (if you are not accepting registrations) or Ended (If the event has ended). If you choose Sold Out or Ended a watermark will be applied to the event listing in the Home page and Search.
– Featured: selecting Yes highlights the event as the main Featured event on the Home Page.
– Home Page: you can decide whether the event is listed on the home page (note events will be listed in chronological order)
– Show Title: To display/hide the title of the box Description
– Show in Top Menu: to display/hide the quick link Description on the Top Menu
6. Registration
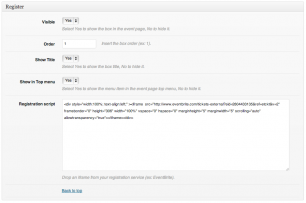
You have the following options:
– Visible: to display/hide the box on the page
– Order: to decide where the box gs in the Main section (Sidebar positioning is not possible with Register)
– Show Title: To display/hide the title of the box Register
– Show in Top Menu: to display/hide the quick link Register on the Top Menu
– Registration Script:
This is where you insert your EVENT SHORTCODE from the EVENT SECTION on your Admin Panel. Examples are:
[tc_event id=”XXX”]
or
[tc_event id=”XXX” quantity=”true”] (to show quantity selector)
Please be sure to replace XXX with the actual id of your event.
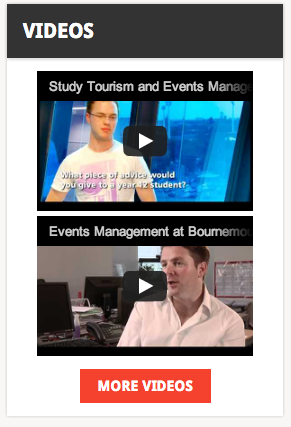
7. Videos
This box controls the display of up to 2 featured videos on the event page and a link to a Video Channel Page.
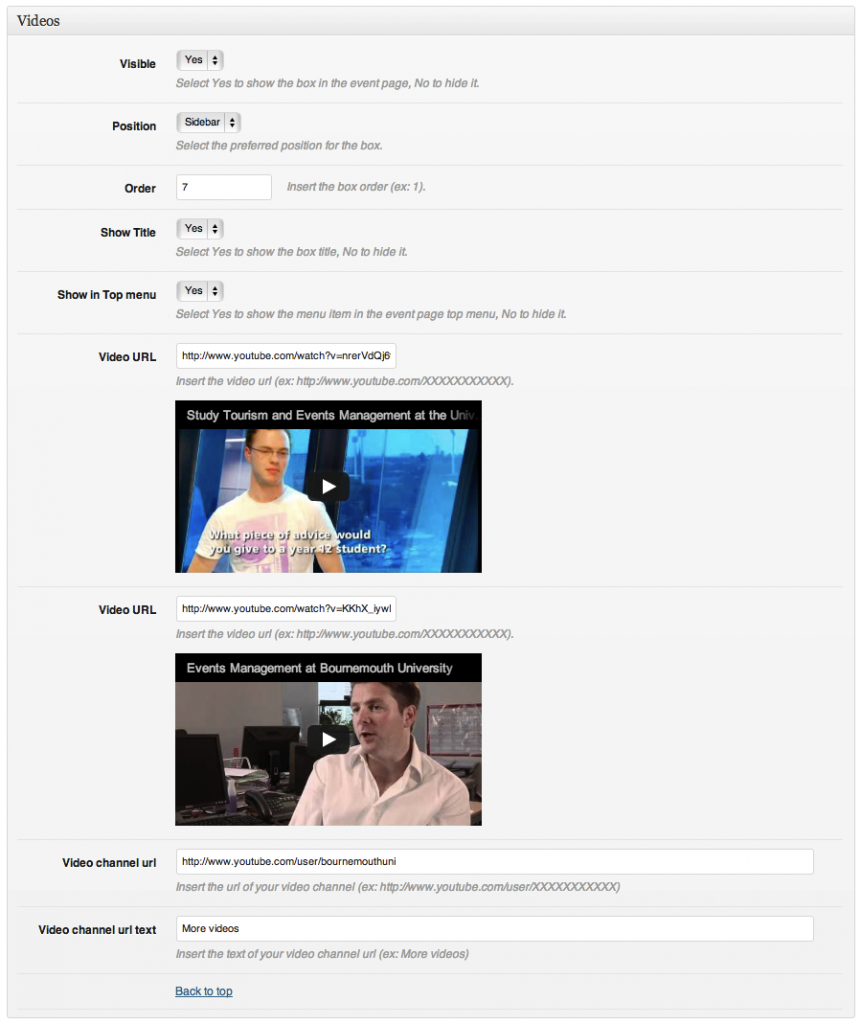
You have the following options:
– Visible: to display/hide the box on the page
– Order: to decide whether to display the box on the Main or Sidebar section.
– Show Title: To display/hide the title of the box Videos
– Show in Top Menu: to display/hide the quick link Videos on the Top Menu
– Video URL: Add a URL from Youtube or Vimeo to display a video of a speaker or previous edition of the event.
Leaving one of the two URL inputs blank will result in only one video showing.
– Video Channel URL: You can add a link of your preference here to a Youtube or Vimeo Channel or to a page with Videos.
– Video Channel URL text: This will be displayed on the button linking to your Video Page. In this example the button says More Videos
8. Sponsors
This box allows you to display an image for a sponsor.
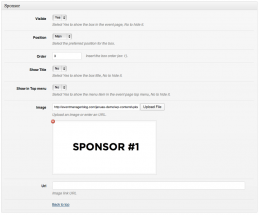
You have the following options:
– Visible: to display/hide the box on the page
– Order: to decide whether to display the box on the Main or Sidebar section.
– Show Title: To display/hide the title of the box Sponsor
– Show in Top Menu: to display/hide the quick link Sponsor on the Top Menu
– Image: Here you can upload the logo or banner of your sponsor. You can create an image with multiple logos if you have more than one sponsor.
– Url: Here you can add a link to your sponsor website
9. Google Maps
This box lets you display a Google Map for your event.
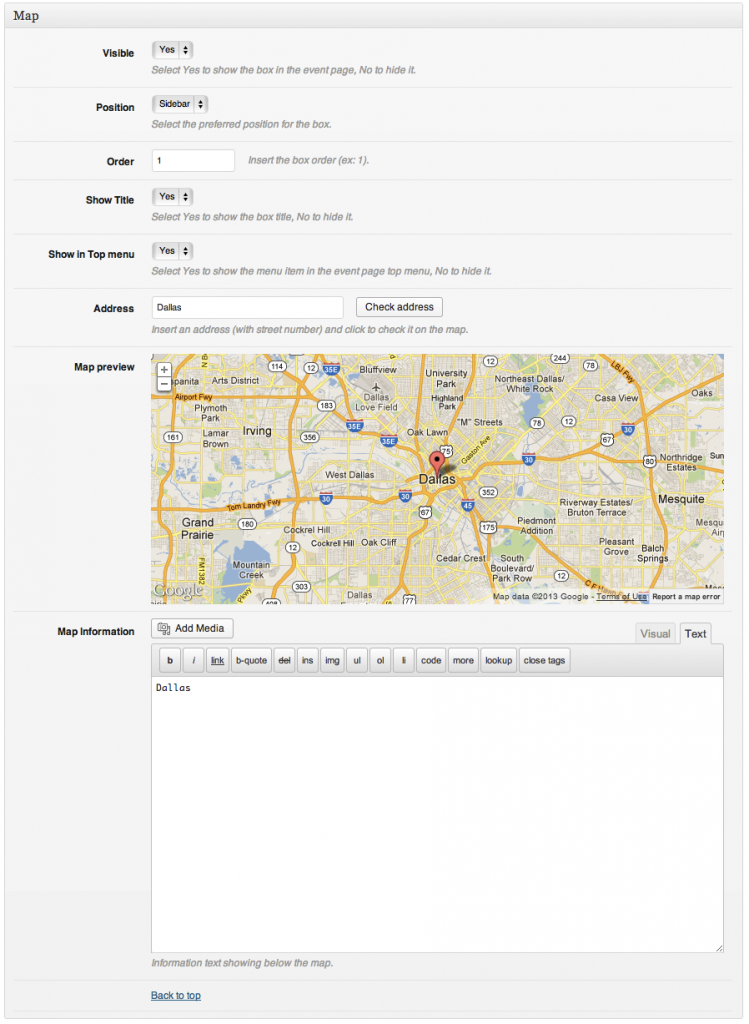
You have the following options:
– Visible: to display/hide the box on the page
– Order: to decide whether to display the box on the Main or Sidebar section.
– Show Title: To display/hide the title of the box Map
– Show in Top Menu: to display/hide the quick link Map on the Top Menu
– Address: Enter the complete address of your venue here to update the map.
– Map Information: Enter the address and any relevant information about your venue.
Remember to dose text and media as they may have a negative impact on the layout.
10. Files
This section is ideal if you want your visitors to download files such as Maps, Schedules and Brochures.
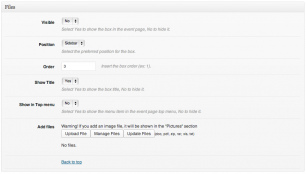
You have the following options:
– Visible: to display/hide the box on the page
– Order: to decide whether to display the box on the Main or Sidebar section.
– Show Title: To display/hide the title of the box Downloads
– Show in Top Menu: to display/hide the quick link Downloads on the Top Menu
– Add Files: Here you can add files with the extension doc, pdf, zip, rar, xls, txt. Do not upload any image (jpg, png, gif etc) as they will displayed in the Pictures box.
11. Picture Gallery
This is the box where you can show a Picture gallery of your event.

You have the following options:
– Visible: to display/hide the box on the page
– Order: to decide whether to display the box on the Main or Sidebar section.
– Show Title: to display/hide the title of the box Pictures
– Show in Top Menu: to display/hide the quick link Pictures on the Top Menu
– Upload: to upload your pictures. Remember to upload the pictures in your preferred display order.
– Manage Gallery: to manage your pictures
– Update Gallery: to display the pictures you just uploaded in the back end.
12. Social Box (add to Facebook)
This box displays a Facebook Page widget on your event page
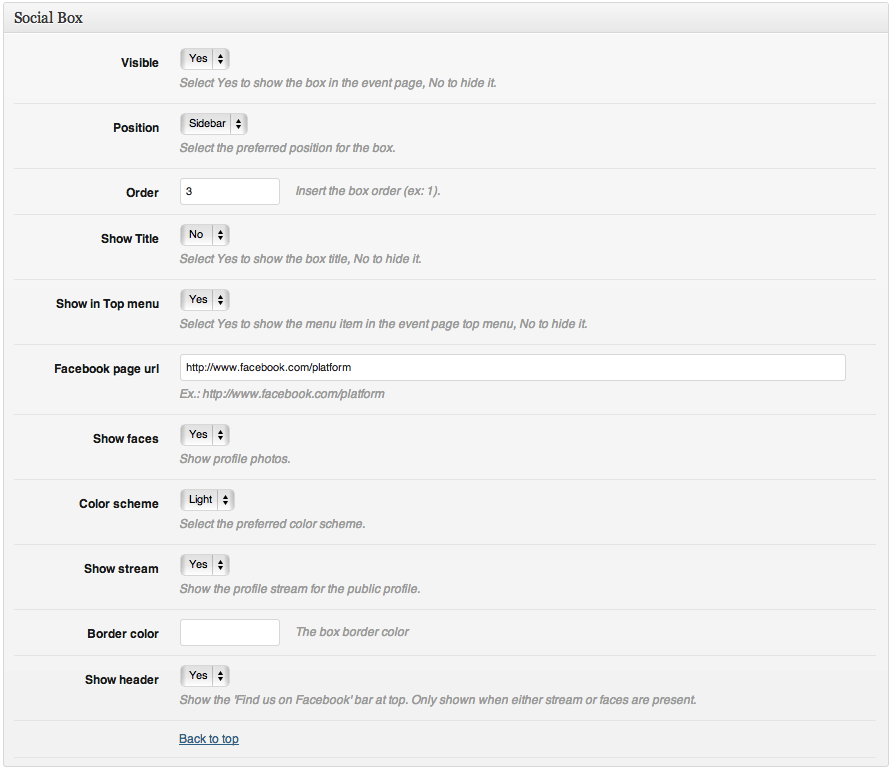
You have the following options:
– Visible: to display/hide the box on the page
– Order: to decide whether to display the box on the Main or Sidebar section.
– Show Title: to display/hide the title of the box Facebook
– Show in Top Menu: to display/hide the quick link Facebook on the Top Menu
– Upload: to upload your pictures. Remember to upload the pictures in your preferred display order.
– Facebook Page Url: the address format is http://facebook.com/nameofthepage “ (facebook.com/pages/name won’t work)
– Show Faces: to display the faces of those who liked your page
– Color Scheme: pre-set Facebook Light or Dark
– Show Stream: hide/display the stream of updates on your page
– Border color: type the name of a color if you want a colored border
– Show Header: This is to show the ˜Find us on Facebook’ bar at top. It is only shown when either stream or faces are present.
13. More (section)
This box is to display everything we may have missed in the boxes above.
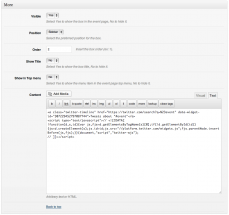
You have the following options:
– Visible: to display/hide the box on the page
– Order: to decide whether to display the box on the Main or Sidebar section.
– Show Title: to display/hide the title of the box More
– Show in Top Menu: to display/hide the quick link More on the Top Menu
– Content: You can add pictures (for more Sponsors), embed a presentation from Slideshare (as in the demo) or a Twitter Widget.
Creating an Event
Please refer to the section above Creating Your First Event
14. Mobile Appearance
Every device displays items different. Components selected to be displayed in the SIDE-BAR will NOT appear on mobile devices and MAY NOT appear on tablets. Be sure to test your site to see what looks best. Got it? Cool!
15. Language Integration
If you want to edit the language files we provided, we suggest to use a free software called Pdit. Here is a comprehensive tutorial on how to do it.
The language files are located in /lib/languages “ You will need to save the files here once edited.
16. Final Review & Promoting your event!
After all of this is finished, be sure to REVIEW your event by going to the EVENT LIST and clicking “VIEW” for each event. Common mistakes are NOT making the tickets viewable, or having incorrect start / end dates (often leftover from a DUPLICATED event).
You can begin promoting your PERMALINK, which can be found in the Top of your event page, in the format
“https://tickets.vacomicon.com/events/YOUREVENT/”
This modified link should also be shared on your Facebook page, and as the ticketing link on your Facebook Event.
We recommend submitting your link to the Facebook Debugger to see how it will appear on Facebook. The Debugger is located at:
https://developers.facebook.com/tools/debug/